Viewing Your
Certificates and Selecting for Tax Deed
The View
Your Certificates and Select for Tax Deed screen allows certificate holders to
view all your previously purchased certificates and start the Tax Deed Process.
Quick Help
To file for tax deed do the following:
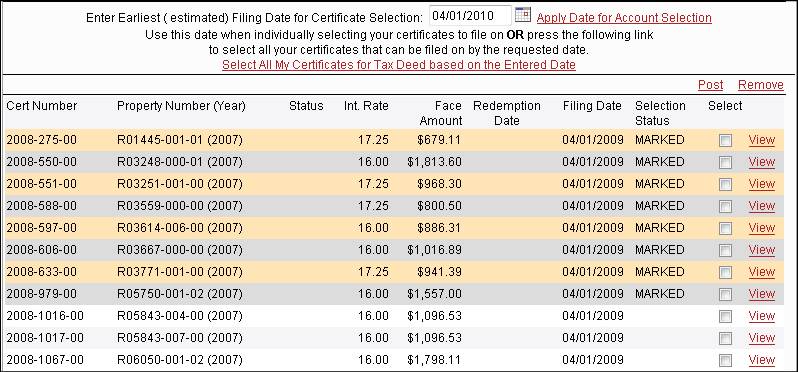
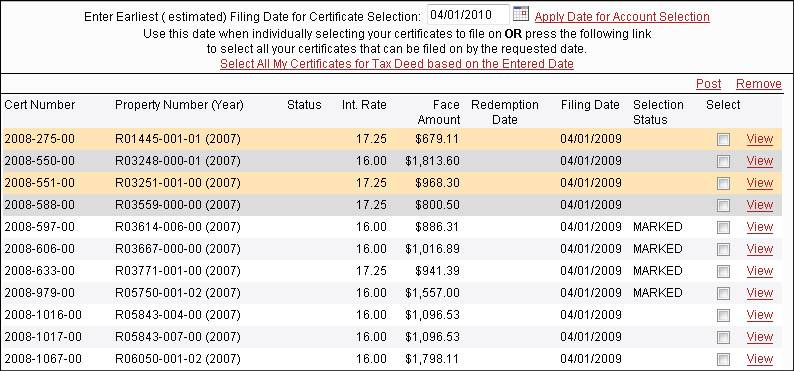
Enter
a Filing Date in the Earliest Filing Date for
Certification field.
Choose Apply
Date for Account Selection.
Select and POST the individual
certificates you wish to file on or
Select all available by choosing Select
All My Certificates for Tax Deed Based on the Entered Date.
Once all your certificates have been MARKED continue
with the Tax Deed Process by going to:
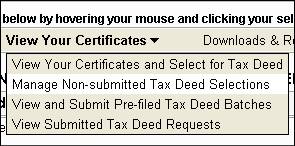
Manage Non-Submitted Tax Deed Selections from the View Your Certificates
drop-down.
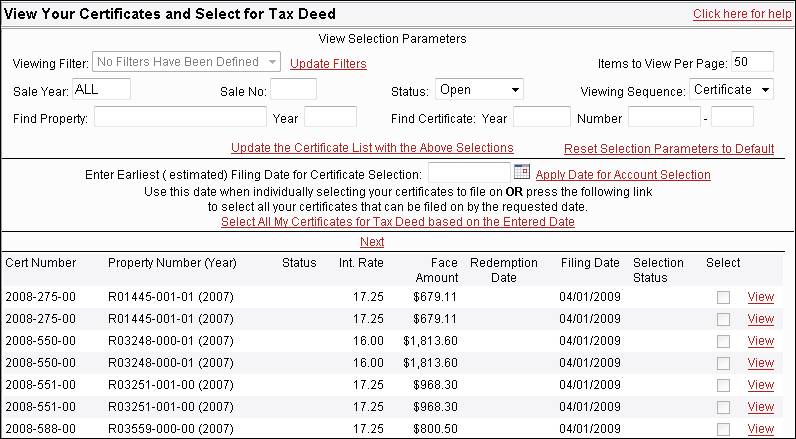
The top
portion of the screen allows you to view your certificates by year and sale
number, by status, in either property or certificate order. It also allows you to input a specific
property number or certificate number to inquire on.
View
Selection Parameters – This area of the screen is used to selectively choose
which certificates you wish to view and select from. Change the viewing selections and hit the
Update the Certificate List with the Above Selections to change the
certificates you view on the bottom of the screen.
Viewing
Filter – The viewing
filter allows you to choose specific certificates to view for purchase. Each holder defines their own filters to
selectively view items. See the Filter
Maintenance Help area to setup and maintain your filters.
Items to
View Per Page – This
field defaults to 50 items to page. You
may enter any number up to 99 items per page.
Sale Year – The sale year is the four digit
year the tax sale certificate was issued.
You may enter the sale year here to view specific sale years. You may also enter ALL to view all your held
certificates.
Status – The status field has five options
- Open, Cancelled, Redeemed, Tax Deed, Special and All Certs. The default is “Open” to show only unpaid
certificates.
Viewing
Sequence – There are
two options for viewing sequence – Certificate and Property. The default is “Certificate”, the
certificates will be listed in certificate order. If you choose Property, the certificates will
be listed by property number.

Find
Property – If you are
looking for a specific certificate and you know the property number you may
enter it here, be sure to include the alpha characters and any dashes. If you
know the year, enter it in the year filed.
If you leave the year blank it will bring up all the years.
Find
Certificate – If you
are looking for a specific certificate and you know the certificate number you
may enter it here. The Year field is the
year the certificate was issued – the Number field has two areas, the first is
the number of the certificate and the second is the sale number in that
specific year. The first tax sale has a
number of “00”; if there were any supplemental sales they would start with “01”
and continue in order.
Update the Certificate List with the Above Selections – Choose this button when you have
filled in the selections in the selections parameters fields. This applies the options you have chosen and
displays the certificates at the bottom of the screen. You may also use the Enter button.
Reset Selections Parameters to Default – By selecting this option in the
selection parameters area the Selection Parameters change to All Open
Certificates. After choosing Reset
Parameters either hit the enter button or the Update the Certificate List with
the Above Selections button to update the screen.
The bottom
portion of the screen lists the certificates that you selected with the options
in the selection parameters area of the screen.
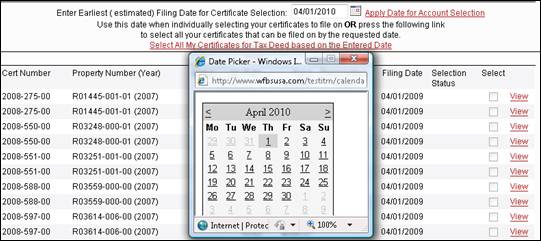
Filing for Tax Deed
To file for
tax deed you must first enter your Earliest
Estimated Filing Date. Either enter
the date MM/DD/CCYY, or choose a date from the calendar. After you have chosen a date select Apply Date for Account Selection. This will update the bottom of the screen
with the certificates that may be applied upon for your estimated filing date.
To select a
certificate, or a list of certificates to file for tax deed on - put a check in
the Select box(es) on the screen and hit the POST button. This will add them into the tax deed
certificates list.
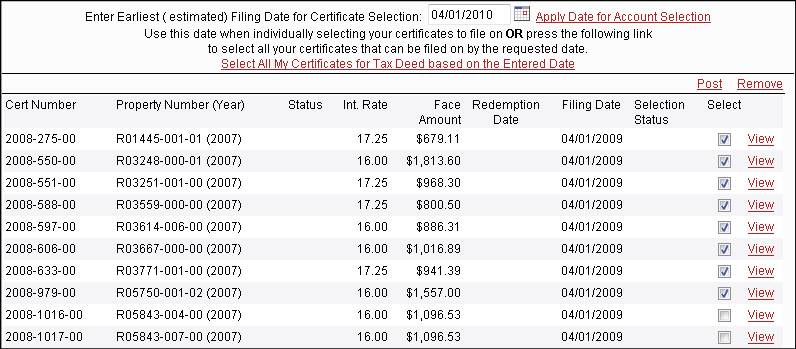
Once a
certificate has been selected and Posted it will have a status of MARKED.
To page
forward/backward through the list of certificates hit the Next, Back or First buttons.
Remember to hit the Post button before you go to the next screen
to update your list.
To apply for
tax deed on ALL your certificates that are available to be filed on put in your
date, Apply Date for Account Selection
and then select Select All My Certificates for Tax
Deed based on the Entered Date this
will mark all your available certificates.
To remove a
MARKED certificate from your list put a check in the Select box and choose the Remove
button. Once Removed the Selection
Status of MARKDED will be removed.
Once all your
certificates have been MARKED you may continue with the Tax Deed Process by
going to Manage Non-Submitted Tax Deed Selections from the View Your
Certificates drop-down.